No products in the cart.

Old-Fashioned Peanut Butter Bars
Last updated on October 6th, 2025
Table of contents
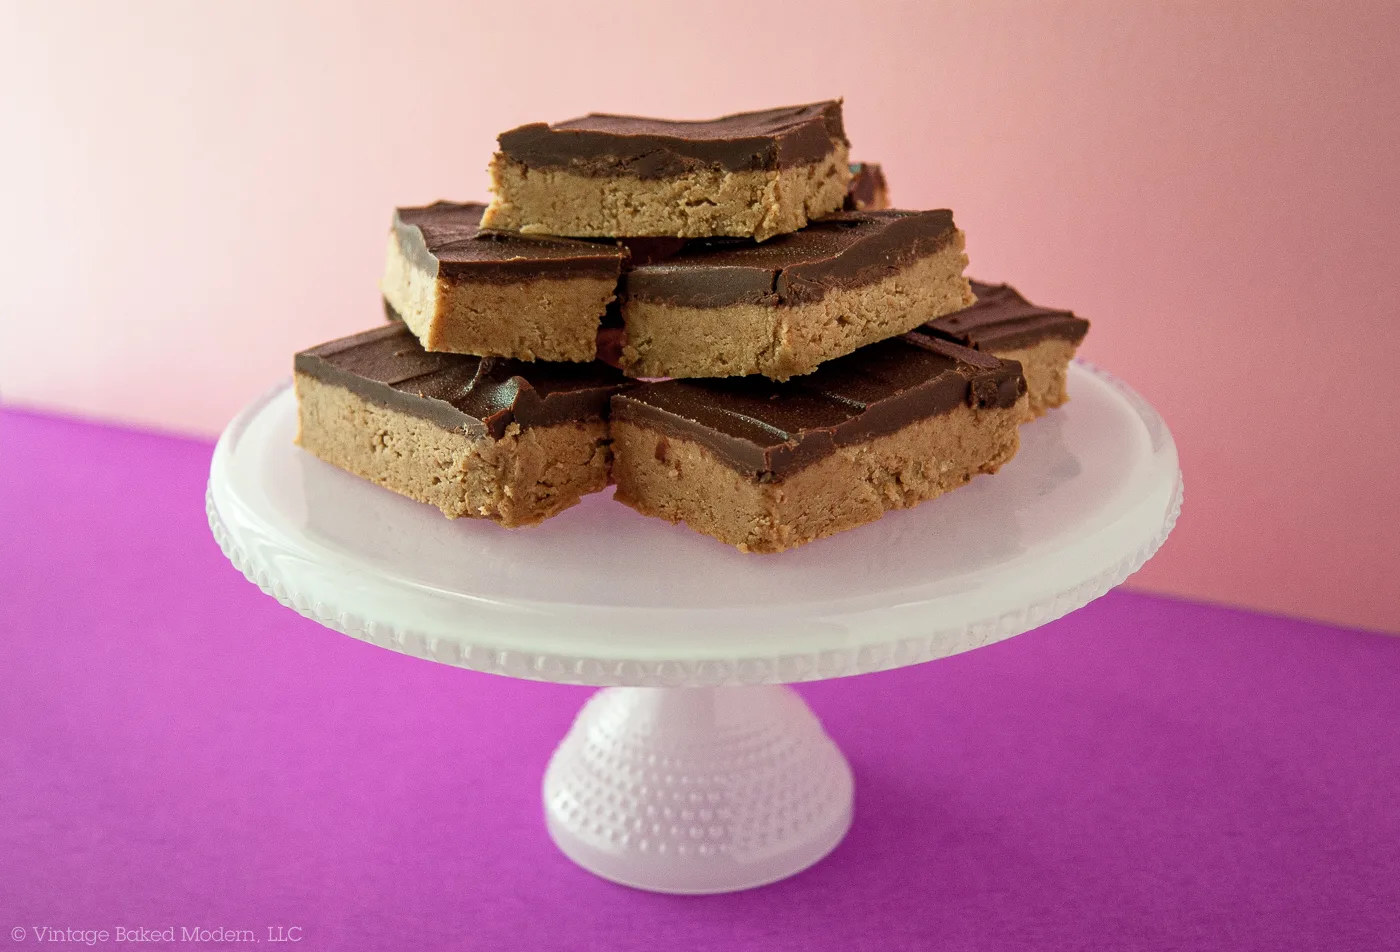
This Old-Fashioned Peanut Butter Bars recipe is a nostalgic, no-bake dessert made with a creamy peanut butter and graham cracker base and a rich chocolate layer on top. This all-natural classic treat is sometimes called other names like peanut butter buckeye bars, lunch lady peanut butter bars, no-bake peanut butter bars or chocolate peanut butter squares. These chocolate peanut butter bars are so easy to make and great to take to summer picnics or Labor Day parties.
My vintage inspiration for these no bake chocolate peanut butter bars is straight from my grandmother’s wooden recipe box that is filled with hand-typed recipe cards. She often made this crowd- pleasing chocolate peanut butter bars recipe for family reunions because they serve a large crowd and don’t require turning the oven on. They’ve become a nostalgic, easy dessert still made today.
Ingredients for old-fashioned peanut butter bars
- Graham crackers – choose a brand of graham crackers made without artificial flavor or high fructose corn syrup for wholesome flavor
- Butter – use unsalted butter or if using salted butter omit the additional salt in the recipe
- Peanut butter – for the best texture use creamy style and with no high fructose corn syrup for the best flavor, chunky style will also work depending on your texture preference
- Confectioners’ sugar – adds sweetness, creating smooth texture in the filling
- Pink salt – enhances flavor and balances sweetness
- Vanilla extract – provides flavor, depth and warmth, homemade is best, or a natural brand with at least 35% alcohol
- Chocolate chips – use semi-sweet chocolate to balance out the sweetness
Check out my Ingredient Glossary for a full description of the ingredients
How to make chocolate peanut butter bars
Step 1: Make the base layer
Melt butter and mix together with peanut butter, powdered sugar, graham cracker crumbs, and vanilla. Press evenly into a 9×13 pan.
Step 2: Melt the Chocolate
Melt chocolate chips with peanut butter in 30-second intervals in the microwave.
Step 3: Make the Top Layer
Pour melted chocolate mixture over the bottom layer and spread evenly.
Step 4: Refrigerate & Serve
Chill for 1–2 hours until firm. Use a sharp knife to cut into squares or bars. Store refrigerated to prevent the chocolate from melting.
How to melt chocolate
Microwave: Melt chocolate by placing one third of chocolate into a glass bowl and microwave for 30-seconds. Then add an additional third of the chocolate and continue to melt in 30-second increments until it is all melted and smooth. Remove from microwave and add in final third of the chips.
Double Broiler: Melt chocolate over double broiler by melting half the chocolate in a glass bowl over a pot of simmering water that is not touching the water, until the chocolate reaches 115-120° (dark chocolate) and 105-110° (milk or white chocolate) and then remove from heat and stir in remainder of chocolate until smooth. Be sure not to heat chocolate over 115°F, as it will burn. For best results, use a stainless steel pot and digital thermometer. Be sure not to let the bottom of the pot touch the water or the chocolate will seize.
Dietary Substitutions
For the past 12+ years, I have owned an all-natural specialty bakery converting conventional recipes to gluten free, vegan, wholesome, etc. Read more about it here.
Here are a few basic tips when converting conventional recipes into specialty baked goods.
- Shelf Life: Specialty baked goods tend to dry out faster and have a shorter shelf life than conventional baked goods. Store in an airtight container on counter for 1 – 2 days. For longer storage, freeze up to 6 months. Avoid refrigerating, as it can dry out baked goods.
- Let Batter Rest: Alternate flours can be dense or slightly gritty compared to white flour, so be sure to let the batter rest at least 15 minutes or overnight in the refrigerator before baking. This allows the flour to fully hydrate and produce a lighter, tender crumb.
- Oven Temperature: Alternative flours are delicate and tend to brown faster before the center is cooked through. Reduce oven to 325° and bake “low and slow,” adding a few extra minutes of bake time if needed.
| Type | Simple Swap | Notes |
|---|---|---|
| Gluten-Free | • Use gluten free graham crackers or crushed rice cereal | • Both Rice Chex or Rice Krispies work |
| Vegan/Dairy-Free | • unsalted vegan butter • plant-based chocolate | • I prefer Violife • Nestle plant based chips |
| Wholesome | • Swap out graham crackers with ground peanut flour • all-natural peanut butter • use natural sweetener | • Use 2 c. ground peanut flour • all-natural peanut butter or homemade • replace confectioners sugar with 1 1/3 c. honey |
Make your own ingredients
Graham Cracker Crumbs: Break up a few crackers and pulse in a food processor and grind into a fine powder.
Vanilla Extract: Purchase Grade B vanilla beans (also called extract-grade), which have less moisture and a more concentrated flavor. Place 8 oz. of bourbon (or vodka) in glass bottle or jar. Split 5-7 vanilla beans down the middle and add to bottle. Let it sit for 3-6 months in a cool, dark place. As you use it, continue to replace the bourbon and add more beans as it keeps for many years.
Homemade Peanut Butter: To make fresh ground peanut butter, purchase roasted, no salt or lightly-salted peanuts and grind in a food processor for 2-3 minutes until desired consistency is reached.
Serve & Store
Refrigerate: Cut bars into 2″ squares, put in a sealed container in the fridge to prevent the chocolate from melting.
Freezer: Place cut bars into a sealed container, line each layer with parchment paper. Store in the freezer up to 3 months. To thaw bring to room temperature before removing the lid and serving.
FAQ’s
What is the best chocolate to use?
Chocolate chips are made with cocoa solids, cocoa butter, sugar, and sometimes milk solids depending on the type. They vary in sweetness based on their cocoa content from dark chocolate (50-90% cocoa solids), semi-sweet chocolate (40-60% cocoa solids) and milk chocolate (10-40% cocoa solids). Dark, semi-sweet or milk chocolate will all work. I prefer to use semi-sweet chocolate so that the bars are not too sweet. For the best flavor, use chocolate chips that do not contain artificial ingredients like Ghirardelli or Nestle.
How do I melt the chocolate chips?
The easiest way to melt chocolate chips is in the microwave by placing half of the chocolate into a glass bowl and microwave for 30-seconds. Then add an additional half of the chocolate and continue to melt in 30-second increments until it is all melted and smooth.
What is the best pan to use?
Use a 9×13 glass pan or a metal quarter-sheet pan. For thicker bars, use a 8×8 square pan.
What type of peanut butter is best?
Peanut butter is made from peanuts, oil, sugar and salt turned into a creamy or chunky texture. Look for one that has “fully hydrogenated oil”, minimal trans fats, and no high fructose corn syrup. Some varieties labeled “natural”, may be “Peanut Butter Spread” containing palm oil. Authentic “all-natural” peanut butter is made from ground peanuts and salt.

Chocolate Peanut Butter Bars
These Classic Peanut Butter Bars are a homemade, no-bake confection with a layer of creamy, sweet peanut butter topped with chocolate. This recipe is also known by other names such as: “peanut butter buckeye bars”, “lunch-lady peanut butter bars,” or “no-bake peanut butter bars.”
Print Recipe Pin RecipeEquipment
- 9×13 glass pan
Ingredients
BASE LAYER
- 2 c. graham crackers finely crushed
- 2 ⅓ c. powdered sugar
- 1 c. butter melted
- 1 c. peanut butter
- ¼ c. peanuts (chop fine) optional
- 1 tsp. vanilla
- ½ tsp. salt
TOP LAYER
- 2 c. semi-sweet chocolate chips
- ¼ c. peanut butter
- 1 tsp. vanilla
Instructions
PREP
- Grease 9×13 pan.
- In a food processor, crush graham crackers into fine crumbs.
- Melt butter in microwave.
BASE LAYER
- Place graham cracker crumbs in mixing bowl and add melted butter, confectioners sugar, peanut butter, salt and vanilla. Spread mixture in bottom of pan.
TOP LAYER
- Melt chocolate chips and peanut butter together and spread over the base layer.
- Refrigerate 1 hour and cut into bars. These are best kept in refrigerator.
Related Recipes
More bar recipes
Tried this recipe? Leave a comment below!
Follow us on social
As an Amazon Associate, I may include affiliate links to recommend products I like to use or suggest and may receive a small commission at no cost to you. Please see my full disclosure for more details.
Any commentary, notes, or recipe adaptations are my own and reflect my professional baking experience in a commercial kitchen. I am not a licensed medical professional and do not provide medical advice.
All modern recipe adaptations and photography © 2025 Vintage Baked Modern LLC. Please do not copy or reproduce without permission.