

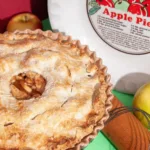
Old-Fashioned Apple Pie
Last updated on July 21st, 2026
Table of contents
Old-Fashioned Apple Pie has a classic pie crust filled with fresh picked apples and loaded with spices like cinnamon and nutmeg. The art of making a pie is so special to me, as the aroma puts me right back in my Nan’s kitchen after a day of picking fresh apples.
I think of making apple pie as more of a “project.” It takes time to make and roll out the dough, prep the apples, make the filling, assemble and bake it. You can find all types of modern gadgets out there to speed up the prep time like apple peelers/slicers. Nan always peeled and cut her apples by hand with a small, old-fashioned wood-handled paring knife. I’ve tried all sorts of fancy apple gadgets over the years, but somehow cutting the apples by hand somehow makes me feel like she’s here in my kitchen today.
Ingredients to make Apple Pie
CRUST
- All-purpose unbleached flour is made by grinding the seeds of the wheat plant and removing the bran and germ. It has a moderate protein content of 10-12%, making it a versatile option for baking cookies, cakes, and pastries.
- Sugar is derived from sugarcane and provides sweetness to baked goods. The most common type being granulated white sugar. Cane sugar is a natural option that is less processed with a slightly courser texture.
- Butter is made from churned cream that contains 80% butterfat. European butter is churned longer and has a higher fat content (82%-85%), which is why it yields more flavor.
- Pink salt is a type of rock salt that contains trace minerals, adding nutrients to baked goods.
- Vodka is a distilled alcoholic beverage made from grains or potatoes. Adding vodka to pie crust will give it a flaky, tender texture because the alcohol prevents the gluten from developing.
PIE FILLING
- Apples like Jonagold, Jonathan and Granny Smith. Jonagold and Jonathan apples for the best combination of flavor and texture. Jonagold and Jonathan apples have balance of both sweet and tart flavor with a firm texture. Granny Smith apples are very tart, and firm, making them ideal for baking since they aren’t as mushy.
- Lemons are a tart, citrus fruit that grow on trees in warm climates. Place lemons on the counter the day you plan to use them, as they will yield more juice at room temperature.
- Instant ClearJel is a modified food starch used as a thickener, stabilizer, and gelling agent, used for pie fillings creating a clear, smooth texture rather than cloudy. In baked goods it helps retain moisture and produces a light, tender texture. Use cornstarch as a substitution if ClearJel is hard to find. For every 1 T. of cornstarch, use 1 1/2 T. ClearJel. For every 2 T. flour or tapioca, use 1 T. ClearJel. You can find it online here.
- Brown sugar is granulated sugar with molasses added, providing deep flavor and moisture to baked goods. Light brown sugar contains 3.5% molasses, while dark brown sugar has 6.5% giving a more robust flavor profile.
- Pink salt adds essential minerals and nutrients to baked goods.
- Apple pie spice is readily available in stores and usually contain a blend of spices like cinnamon, nutmeg, mace and cloves. MAKE YOUR OWN! Just mix a few staple fall spices like cinnamon, nutmeg, ginger, cardamom, and allspice for a custom rich blend. Here is my recipe for Apple Pie Spice blend.

How to zest and juice a lemon
- Using lemons in baked goods will offer a bright, zingy flavor and their natural acidity will activate leavening like baking soda or baking powder to ensure a light and tender rise.
- Put lemons on the counter the day you plan to use them as room temperature lemons yield more juice than ones straight out of the fridge.
- Be sure to remember to zest your lemon before you juice it. The easiest way to zest a lemon is to use a Microplane.
- To juice the lemon, use a hand-held lemon squeezer or a vintage style glass citrus reamer with bowl.
CRUST
- To avoid a tough crust, add vodka or white vinegar to prevent excess gluten from forming. This not only keeps the crust flaky, it also prevents shrinking during baking.
- To save time, make the pie crust ahead of time and place in refrigerator or freezer until needed.
- Work quick to keep everything cold as possible.
FILLING
- When using frozen fruit, do not thaw before adding it to the pie filling or it can make the pie watery and mushy.
- Fresh fruit filling or pre-made filling will both work. Its easy to pre-make homemade pie filling after you pick or harvest fresh fruit in season. Follow the USDA canning procedures or store in freezer safe containers or ziploc bags.
ASSEMBLE PIE & BAKE
- To prevent a soggy crust, dust the bottom crust with a thickening agent and brush with an egg wash.
- Use a ceramic or glass pie plate, which conduct slow, even heat.
- To make the lattice pattern, cut strips of dough, weave into pattern on top of a piece of parchment paper. Chill until use, and lay the pattern on the top of the filling.
- For a shiny, brown crust, brush the entire pie with egg wash sprinkled with course sanding sugar.
- Put the assembled pie in the fridge for about 15 minutes prior to baking to ensure the crust from shrinking.
- Cover crust with pie protector or foil to make sure the filling is cooked through but that the crust doesn’t burn.
Dietary Substitutions
For the past 12+ years, I have owned an all-natural specialty bakery converting conventional recipes to gluten free, vegan, wholesome, etc. You can read more about my pro-baking here.
Here are a few basic tips when converting conventional recipes into specialty baked goods.
- Shelf Life: Specialty baked goods tend to dry out faster and have a shorter shelf life than conventional baked goods. Store in an airtight container on counter for 1 – 2 days. For longer storage, freeze up to 6 months. Avoid refrigerating, as it can dry out baked goods.
- Let Batter Rest: Alternate flours can be dense or slightly gritty compared to white flour, so be sure to let the batter rest at least 15 minutes or overnight in the refrigerator before baking. This allows the flour to fully hydrate and produce a lighter, tender crumb.
- Oven Temperature: Alternative flours are delicate and tend to brown faster before the center is cooked through. Reduce oven to 325° and bake “low and slow,” adding a few extra minutes of bake time if needed.
Gluten-Free (no gluten)
- Flour: Swap out the flour with a premium gluten-free flour such as King Arthur Measure for Measure or use a homemade gluten-free flour blend. Be sure the flour blend contains xanthan gum or add 1/4 tsp. to 1/2 tsp. per every 1 cup of flour to the recipe.
- Hydration: Gluten free flours can make baked goods dense. Add 1 tablespoon of additional extra liquid (the same liquid called for in the recipe) to help lighten the texture.
- Fat: Add up to 1 to 2 Tbsp of additional fat, such as butter or oil to the recipe.
Vegan/Dairy Free (no animal products)
- Butter: Use unsalted vegan butter sticks such as Violife for best flavor and texture.
- Dairy: Replace dairy with unsweetened plant based milk such as oat, coconut or almond milk.
- Eggs: Replace each egg by adding 1 tsp. baking soda to the batter, then pour 1 Tbsp. white vinegar over it. Add the vinegar last though, to keep the leavening reaction.
- Fat: Add up to 1 to 2 Tbsp of additional fat like oil or vegan butter to the recipe.
Keto (low carb, high fat)
- Flour: Swap the white flour for almond flour or coconut flour.
- Sweetener: Replace sugar with Lakanto Monkfruit Sweetener which calls for a 1:1swap that mimics granulated sugar.
- Dairy: Replace dairy with unsweetened plant based milk such as coconut or almond milk.
- Hydration: Almond flour can make baked goods dense. Add 1 -2 tablespoons of additional extra liquid (the same liquid called for in the recipe) to help lighten the texture. Add 1 additional egg to help bind the batter.
- Fat: Add up to 2 Tbsp of additional fat, such as butter or oil to the recipe.
Wholesome (minimally processed)
- Flour: Swap out 1/3 to 1/2 of the white flour with King Arthur white whole wheat flour or King Arthur 100% whole wheat flour or Bob’s oat flour.
- Sweetener: Replace white sugar with maple syrup or honey. Use 3/4 c. honey for every 1 c. sugar. You can also swap out the white sugar with 1:1 swap using natural cane sugar, coconut sugar or date sugar.
- Dairy: Replace dairy with unsweetened plant based milk such as oat, coconut or almond milk.
- Lower Fat: For every 1 c. of butter, use 3/4 c. heart-healthy oil (like canola or extra-light olive) OR 1/2 c. unsweetened applesauce + 1/2 c. oil.
Allergen Free (none of the 9 allergens)
Nuts: Omit all peanuts and tree nuts (almonds, brazil nuts, cashews, hazelnuts, macadamia nuts, pecans, pine nuts, pistachios, or walnuts.use Violife Plant Butter.
Flour: Swap out the flour with a premium gluten-free flour such as King Arthur Measure for Measure or use a homemade gluten-free flour blend that does not contain tree nuts or soy. Be sure the flour blend contains xanthan gum or add 1/4 tsp. to 1/2 tsp. per every 1 cup of flour to the recipe. Here is a list of some other gluten-free flours to try.
Butter: Use unsalted vegan butter sticks such as Violife for best flavor and texture. Add up to 1 to 2 Tbsp of additional fat like oil or vegan butter to the recipe.
Dairy: Replace dairy with unsweetened plant based milk such as oat or coconut milk. Check the labels to make sure they are soy-free and nut-free.
Eggs: Replace each egg by adding 1 tsp. baking soda to the batter, then pour 1 Tbsp. white vinegar over it. Add the vinegar last though, to keep the leavening reaction.
Storage
Baked Pie: After the pie is baked, cover pie and leave on counter up to 3 days. You can also freeze a pie that has been baked up to 6 months.
Unbaked Pie: Cover pie with saran wrap or foil. Place covered pie in a freezer-safe container up to 6 months. Bake pie straight from freezer and add additional baking time as needed.
Old-Fashioned Apple Pie
Equipment
Ingredients
CRUST
- 2 c. unbleached flour
- 1-2 tsp. sugar
- 1 tsp. salt
- 12 T. butter cold & diced into cubes
- 1/3 c. ice cold water
- 1 T. vodka lemon juice or white vinegar
PIE FILLING
- 8 c. apples sliced or diced
- 1/3 c. sugar
- 1/3 c. brown sugar
- 2 T. instant clearJel or cornstarch
- 2 T. lemon juice
- 1 T. lemon zest
- 1 T. Apple Pie Spice
- 1 tsp. vanilla
- 2 T. diced butter
- pinch salt
Instructions
PREP
- Prep apples by slicing or cutting into bite-size pieces and set aside.
- Place ice cubes in glass of water and set aside. Dice up butter into small cubes and put in freezer until making the crust.
CRUST
- Place flour, sugar, and salt into food processor. Add cold butter, water, and vodka and pulse just until the dough comes together (crumbly).
- Pour out the crust onto a piece of saran wrap and shape into round disk. Cut into half. Roll out dough between 2 sheets of parchment paper. Shape into round disk with enough to hang 1” over your pie pan. Do this process again with the other disk. Refrigerate 10-20 minutes if using right away or overnight.
- Use one disk for the bottom crust. Place in pie pan, crimp and trim edges. Dust bottom of crust with thickening agent (clear jel or tapioca) and then brush lightly with egg wash (1 egg+1 T. cream). Pierce pie shell with fork.
- For the top crust cut out decorative shapes with pie cutters or mini cookie cutters and place in fridge until ready to assemble pie.
PIE FILLING
- Place apples, brown sugar, ClearJel, lemon juice, apple pie spice and vanilla and stir until incorporated.
- Pour filling into crust, top with diced butter spread around. Place top crust over the filling. Brush with egg wash and sprinkle with course sanding sugar. Place assembled pie in fridge to chill for 10 minutes.
BAKE
- Bake pie at 400° for 15 minutes. Reduce oven to 375° cover with foil placed with a pie protector over the foil and bake an additional 45-50 minutes. Watch to see when pie starts to bubble, then let it bake 5 more minutes.
Related Recipes
Pie recipes
Tried this recipe? Leave a comment below!
Follow us on social to see more of our cozy collection curated for nostalgic bakers who love looking at vintage cookbooks, original vintage recipes, and retro magazine clippings.
This post may contain affiliate links. As an Amazon Associate, I recommend products I like to use or suggest and may receive a small commission at no cost to you. Please see my full disclosure for more details.
Any commentary, notes, or recipe adaptations are my own and reflect my professional baking experience in an FDA-inspected, commercial kitchen. I am not a licensed medical professional and do not provide medical advice.
All modern recipe adaptations and photography © 2025 Vintage Baked Modern LLC. Please do not copy or reproduce without permission.